Tuesday, 1 December 2015

Clouds in Photoshop


In this tutorial we will learn to create the clouds in photoshop. This is very easy task and nothing more complicated just inbuilt tools and some creativity and you are done with it. Let's start it then:

Step 1: Requirements:
  1. Adobe photoshop
  2. Your focus

Step 2: Getting started
Create new photoshop workspace and fill it with light colors I have done it with creamy color with light orange color:


Step 3: Effects
Now just apply some effects on the workspace i.e Layer1 as follows:
Step 4: Add a new layer and create a rectangle with the Rectangle Tool. Make it slightly smaller than the background, so it will have some borders. After that apply a Gradient Overlay via Layer Styles. 
 Step 5:
For the Clouds I created a brush. It's really easy and I learned that from another tutorial I found online, But I decided to show you the screenshots too, because it's easier to follow. Basically create a brush and use this settings:
  • Brush Tip Shape: Round shape, 500px Diameter, 0% Hardness, 25% Spacing.
  • Shape Dynamics: 100% Size Jitter, 20% Minimum Diameter, Angle Jitter 20%, Roundness Jitter 0%.
  • Scattering: Scatter Both Axes and 120%, Count 5, Count Jitter 100%.
  • Texture: Select Clouds for the Pattern, 400% for the Scale (but you can make it bigger if you want the couds softer and you will have to reduce the size if you want a smaller brush). Mode Color Burn
Go to- Window>Brushes
Remember: you need to choose any of the Brush tool first before applying brushing effects from toolbox.

Step 6:
Now add a new layer and select white for the color. Choose the Cloud brush and start painting the cloud. The secret here is painting it very slowly, click by click until you get the shape you want.
 Step 7:
The previous step we created the first part of the cloud, but to make it look more realistic you will have to create some dark areas. Add another layer on top of the white cloud and go to Layer>Create Clipping Mask. Select black for the color and change the Brush Opacity to 50% . Then start painting the dark areas. If you look at some real clouds you will notice that these dark areas are always at the bottom of the clouds, so do the same.
You can add some effects as I have done:

 Step 8:
Create another cloud and place it on the other side. And place left or right and done. Just play sometime with it and you will hit it somewhere. Now Add a Circle filled with white into same workspace and this seems to be as below:

 Step 9:
Now in the next stage you just need to do some effects as follows if you want:
Step 10:
 Finally if you want you can add some thoughts of yours into it as I have done:
Here is my jpeg format image:
Happy designing.


Sunday, 29 November 2015

Resolution independent GUI- Java Tutorial

Hello everyone, I am back with more exciting design tutorials that will really help you to develop a desktop application. In the previous tutorial I have provided java code for developing a simple login page GUI. In this tutorial I am going to explain that how we can achieve the resolution independency using Dimension class in java which is a prebuild library.  The reason of this tutorial is to make our application resolution independent i.e. we will execute our application on low resolution systems even if it is developed on high resolution systems  It will  So let's start.

Step 1: As usual you need the design ready with you using Adobe photoshop. This time you need not to define any specific size of size because we will make it resolution independent. I have used this picture as background, you can choose or create your own as you will be known to the software very much, I Hope SO.

Step 2: Next step is to start creating Jframe with some components as shown below:
  1. JLabel
  2. ImageIcon
  3. Image
An additional class this time is the Dimension class which I have initialized in class as well:
"Dimension d=Toolkit.getDefaultToolkit().getScreenSize();"
This is the class that will make a difference in our previous codes where could not accessed resolution of our screen but here we will retrieve the resolution of the screen from the object we have created i.e. d. We can make it as follows:
Frame.setBounds(0,0,d.width,d.height);
Look's easy right!

Step 3:
Once we have got the components and resolution of the screen we can start our remaining short code by filling the Jlabel with the image with the help oh ImageIcon object. But it is not a scalable icon. If you directly use image as icon to Jlabel then you will get the background but not the independency on other computers. For that purpose we have used Image class as follows for grabbing the image:

backI = ImageIO.read(new File("F:/Pics/SUCCESS.jpg"));        

This line belongs to image acquisition form disk and below is the code snippet to scale the image to adjust the reolution mapping to image. This is an automatic scaling.

backI = backI.getScaledInstance(back.getWidth(), back.getHeight(),Image.SCALE_REPLICATE);
That's the code explanation that how we will make a resolution independent GUI in java. With the help of these you can develop any type of application for any resolution system. Here is the complete code:

import java.awt.*;
import java.io.File;
import java.io.IOException;

import javax.imageio.ImageIO;
import javax.swing.*;


public class Resolution_independent {
   
    //declaration of components and frame
    public static JFrame frame;
    public static Container container;
    public static JLabel back;
    public static Image backI;
    public static ImageIcon backi;
    public static Dimension d=Toolkit.getDefaultToolkit().getScreenSize(); //for resolution independency

   
    public Resolution_independent() throws Exception{
        frame=new JFrame();
        container=frame.getContentPane();
        container.setLayout(null);
        back=new JLabel();
        //Set bounds of all controls
        frame.setBounds(0, 0, d.width, d.height);
        back.setBounds(0,0,frame.getWidth(),frame.getHeight());
       
        //background image
        backI = ImageIO.read(new File("F:/Pics/SUCCESS.jpg"));   
        backI = backI.getScaledInstance(back.getWidth(), back.getHeight(),Image.SCALE_REPLICATE);
        backi = new ImageIcon(backI);
        back.setIcon(backi);//set icon as image
       
       
        //adding Jlabel to container
        container.add(back);
       
        frame.setUndecorated(true);
        frame.setVisible(true);
        frame.setDefaultCloseOperation(JFrame.EXIT_ON_CLOSE);
       
    }

    public static void main(String[] args) throws Exception {
        Resolution_independent re=new Resolution_independent();

    }

}

And here is the image I have used:


Happy Designing!

Saturday, 12 September 2015

How to get started with the web designing

Hello everyone, today I got up with some facts and reality about the web designing basics. This is the first time I am providing you something about web designing first time since it is the most demanding technology if you want to work as a UI designer. Web designing is not more different than the other technology in the perspective of designing. The difference occurs in the usage and the scope. I will demonstrate the basic things here with some examples.
 

1. What is web designing?

According to my experience and usage, I will describe it in my words. Web consists of many things that may help to reach more people at a particular instance. In order to attract more people, User Interface of the web page is very critical task and no wonders they will get more stipend then a basic desktop designers. Web pages are just the pages or sub-pages that will help to describe your website. I have designed many of the sites using HTML and JSP, PHP, CSS but it were worked well because I have designed it very well and spend more time on designing only. So, if you are a designer than you are very crucial part of the web designing.


2. How to start designing it?

As I have told you about the web designing, now I will just suggest you some sites for get hands on it very well as I have also learnt from it. I will advice you to directly start with the website(any website I have e-shopping) rather just practicing each and every module of that technology. The reason behind it is that if you spend your precious time on the learning and practicing those modules you will realize somewhere that there is no end to it, so just start thinking of a website and start designing. I will here providing you with the designing aspects and you just refer those suggested websites and you are done.


Following are the websites that will help you to learn at least basics of web development: 

  • You can also refer this website

    There are many website which provide you web development part but I prefer above website. Also there are more technologies like php but the above given three are mostly preferred to develop a web page but still if you want to learn php and more, you can refer above site itself.

    If you have any issue regarding this please contact me directly through mail or comment on the blog. I am finishing now here this blog post by hoping that in the next post you will be well prepared with the basics of the web page development.

    Happy Designing

Tuesday, 1 September 2015

Designing the Animations- Java 7(Part 2)-The Code

Here is the code snippet for the Ball_Animate.java:
import java.awt.Color;
import java.awt.Container;
import java.awt.event.ActionEvent;
import java.awt.event.ActionListener;

import javax.swing.*;
public class Animate_Ball {

    public static JFrame fr;
    public static JLabel ball1;
    public static Timer balltimer;
    public static Container c;
    public static ImageIcon i;
   
   
    public Animate_Ball() {
       
        fr=new JFrame();
        ball1=new JLabel();
        c=fr.getContentPane();
        i=new ImageIcon("ball.png");
       
        c.setLayout(null);
       
        fr.setBounds(0, 0, 800, 500);
       
        ball1.setBounds(0, 9, 179, 168);
       
        ball1.setIcon(i);
        c.setBackground(Color.black);
        c.add(ball1);
        fr.setVisible(true);
       
balltimer=new Timer(6, new ActionListener() {            //ball animator
           
            @Override
            public void actionPerformed(ActionEvent arg0) {
       
                if(ball1.getX()<fr.getWidth()){
                    ball1.setLocation(ball1.getX()+5,ball1.getY());
                }
                else{
                    ball1.setLocation(0,9);
                }
                   
            }
        });

    }
   
    public static void main(String arr[]){
        Animate_Ball n=new Animate_Ball();
        n.balltimer.start();
    }

}

And the output will be moving ball. You can experiment it with the moving ball vertically by changing the ball1.getY()+5.


Happy designing with java.

Monday, 31 August 2015

Designing the Animations- Java 7(Part 2)

Welcome back guys, I will now make you entered into the coding now. We will move the ball now on the Frame.

So, first of all open the eclipse Luna and create new project in it with any name you prefer to give.
I will assuming that you know all these basic stuff of opening and creating project in Eclipse and creating a new class. I will now directly skipping to code:

Step 1.
The stuffs you will need in the code::
    public static JFrame fr;
    public static JLabel ball1;
    public static Timer balltimer;
    public static Container c;
    public static ImageIcon i;


Frame is necessary to residing or a base for your ball and container will contains all your components, in our case it will contain our ball. Timer is used for continuously moving ball, our actual code logic resides here.

So let's start the further initialization.

Step 3.
public Animate_Ball() {
       
        fr=new JFrame();
        ball1=new JLabel();
        c=fr.getContentPane();
        i=new ImageIcon("ball.png");

        .
        .
 This is the constructor in which we will initialize all stuffs. Frame is initialized and ball object is initialized here and note that I have used Label for that purpose. Container is initialized with the Frame's contents. Now the primary thing is the ImageIcon which includes path of your image file or you can put it in your eclipse project files where your code resides or outside src folder.

Image stored here


This is the way you can create a simple animation through small code. Now next is the main code:

Step 3.
        c.setLayout(null);
        fr.setBounds(0, 0, 800, 500);
        ball1.setBounds(0, 9, 179, 168);
        ball1.setIcon(i);
        c.setBackground(Color.black);
        c.add(ball1);
        fr.setVisible(true);

I have just set layout as null because I want to move my label freely anywhere on the frame. Then set bounds according to the image size, my image size is 179*168. Then set the icon to the label that you have initialized earlier in Step 2. Then I want my background black hence I have changed the background of container but not the frame because frame contains the container and container contains components.
Lastly add the components to container and set visible the frame.

Step 4.
balltimer=new Timer(6, new ActionListener() {            //ball animator
           
            @Override
            public void actionPerformed(ActionEvent arg0) {
       
                if(ball1.getX()<fr.getWidth()){
                    ball1.setLocation(ball1.getX()+5,ball1.getY());
                }
                else{
                    ball1.setLocation(0,9);
                }
                   
            }
        });


Now you have to give your logic here that will execute continuously after the 6 sec interval as I mentioned, you can add more time. Initialize the timer as shown above and make use of CTRL+ SPACEBAR while typing to ease your typing. Then you need to call your timer by using balltimer.start();. Either call it from the constructor but below the initialization of the timer otherwise you will get exceptions or you can call it from main().

If you understood the concept then just create complete code from it then and only then you will get it clearly. Otherwise I will upload the code anyway in next tutorial.

Happy Designing with Java.

Sunday, 30 August 2015

Designing the Animations- Java 7(Part 1)


I am back again with the thing that will make you feel joyful and exciting. I was already gave you a basic knowledge about the designing in Photoshop. Today I will demonstrate you all about the animation in java with the help of obviously Adobe Photoshop.

Here are the things you will need while going through out the tutorial:
  1. Adobe Photoshop
  1. Java 7
  1. Eclipse Luna

Step 1.
First thing you need to do is that just create a ball in Adobe Photoshop. Don't worry,  I will help you out with this as usual.

Just select the shape tool but it doesn't appear as you move your mouse upon it. It's depends upon your previous selection in project. It may be named Line tool, Polygon tool, etc. You need to select Ellipse tool.  I already explained about Toolbox tools and selection. 

 
Initial Stage

Now draw it on the workspace like I have done. Get a reference of the image given above.

You will have a kind of scenario as shown above. It may differ as you are doing it in your own way. I am assuming that you have done with it and colored your ball. But still there's something you that don't make you feel it as a ball so here is the trick for giving it an illusion of 3d ball.

Step 2.
Remember guys everything you see in the real life is completely a part of illusion but that doesn't mean that everything you see in real world is falsified. It's just contains some illusions. So here is our illusion in virtual world, first of all make sure you have colored ball with something dark as I have done. 

Create ball


As I have selected blue color because it seems really shining color. Now the next thing you need to do is that select brush tool. But it will not allow you to color it directly so first Rasterize by right clicking on the Layer(Shape 1 if you didn't named it) and select Rasterize option. Now you have the rights to color it through any color.

Step 3.

Just now select Brush tool to make the ball shine. Change the foreground color to white and just click once on the area where you want the shine on ball like I have done. Note: Select entire ball by CTRL+ Left Click on the Shape 1 layer on layer Bar, it will select entire ball at once and then put the brush tool containing white and size may vary based on your scenario.
Final touch on ball
 Here is the sample ball I have created in png format:
In the Next tutorial I will describe the further steps.

Happy Designing.

Monday, 3 August 2015

Programming the Designs(GUI) Part-3

Here is the code snippet that I have described in previous tutorial:
import java.awt.Color;
import java.awt.Container;
import java.awt.Font;
import java.awt.Image;
import java.io.File;
import java.io.IOException;

import javax.imageio.ImageIO;
import javax.swing.ImageIcon;
import javax.swing.JFrame;
import javax.swing.JLabel;
import javax.swing.JPasswordField;
import javax.swing.JTextField;

import java.awt.Rectangle;
import java.awt.event.MouseEvent;
import java.awt.event.MouseListener;

public class FirstGUI {
//declaration
    public static JFrame fr;
    public static JLabel back,login,loginl,text1,text2,rapid;
    public static JTextField user;
    public static JPasswordField pass;
    public static Font f;
    public static Container c;
    public static Image backI,eleI;
    public static ImageIcon backi,elei;
   
    public FirstGUI() throws Exception {

      
        fr=new JFrame();//Frame initialization
      
        //font for headings
        f=new Font("Arial Rounded MT Bold", Font.BOLD, 32);
        //container pane for adding controls
        c=fr.getContentPane();
        //setting layout null so we can add controls anywhere by setting bounds
        c.setLayout(null);
      
        //initialization of controls
        back=new JLabel();
        user=new JTextField("User name");
        pass=new JPasswordField("Password");
        login=new JLabel();
        loginl=new JLabel("Login",JLabel.CENTER);
        text1=new JLabel();
        text2=new JLabel();
        rapid = new JLabel();


        //setting bounds of the frame to the Dimension d initialized in class definition
        fr.setBounds(0,0, 500, 500);
        back.setBounds(0,0,fr.getWidth(),fr.getHeight());
        user.setBounds(172,  138, 180, 61);
        pass.setBounds(172,  210, 180, 65);
        loginl.setBounds(155, 286, 197, 65);
        login.setBounds(loginl.getBounds());
        rapid.setBounds(0, 38, 484, 71);
        //background image bounds
        text1.setBounds(user.getBounds());
        text2.setBounds(pass.getBounds());
      
        //making textField background transparent
        user.setOpaque(false);
        pass.setOpaque(false);
      
        //making textfield borders off
        user.setBorder(null);
        pass.setBorder(null);


        //background image
        backI = ImageIO.read(new File("/MyFirst/src/images/back1.jpg"));  
        backI = backI.getScaledInstance(fr.getWidth(), fr.getHeight(),Image.SCALE_REPLICATE);
        backi = new ImageIcon(backI);
        back.setIcon(backi);
      
        //login click
        eleI = ImageIO.read(new File("/MyFirst/src/images/login.png"));  
        eleI = eleI.getScaledInstance(login.getWidth(), login.getHeight(),Image.SCALE_REPLICATE);
        elei = new ImageIcon(eleI);
        login.setIcon(elei);
      
        backI = ImageIO.read(new File("/MyFirst/src/images/textbox.png"));  
        backI = backI.getScaledInstance(user.getWidth(), user.getHeight(),Image.SCALE_REPLICATE);
        backi = new ImageIcon(backI);
        text1.setIcon(backi);
        text2.setIcon(backi);
      
        backI = ImageIO.read(new File("/MyFirst/src/images/RapidAbcd.png"));  
        backI = backI.getScaledInstance(rapid.getWidth(), rapid.getHeight(),Image.SCALE_REPLICATE);
        backi = new ImageIcon(backI);
        rapid.setIcon(backi);
      
        user.setFont(new Font("Arial", Font.BOLD, 15));
        user.setForeground(Color.gray);
        pass.setFont(new Font("Arial", Font.BOLD, 15));
        pass.setForeground(Color.gray);
        loginl.setFont(new Font("Arial", Font.BOLD, 20));
        loginl.setForeground(Color.white);
      
        c.add(rapid);
        c.add(user);
        c.add(pass);
        c.add(text1);
        c.add(text2);
        c.add(loginl);
        c.add(login);
        c.add(back);


        fr.setDefaultCloseOperation(JFrame.EXIT_ON_CLOSE);
        fr.setVisible(true);
      
login.addMouseListener(new MouseListener() {
   
    @Override
    public void mouseReleased(MouseEvent arg0) {
        try {
            eleI = ImageIO.read(new File("/MyFirst/src/images/loginhover.png"));
      
        eleI = eleI.getScaledInstance(login.getWidth(), login.getHeight(),Image.SCALE_REPLICATE);
        elei = new ImageIcon(eleI);
        login.setIcon(elei);
        } catch (IOException e) {
            // TODO Auto-generated catch block
          
        }  
    }
   
    @Override
    public void mousePressed(MouseEvent arg0) {
        try {
            eleI = ImageIO.read(new File("/MYFirst/src/images/loginclick.png"));
      
        eleI = eleI.getScaledInstance(login.getWidth(), login.getHeight(),Image.SCALE_REPLICATE);
        elei = new ImageIcon(eleI);
        login.setIcon(elei);
        } catch (IOException e) {
            // TODO Auto-generated catch block
          
        }          
    }
   
    @Override
    public void mouseExited(MouseEvent arg0) {
        try {
            eleI = ImageIO.read(new File("/MYFirst/src/images/login.png"));
      
        eleI = eleI.getScaledInstance(login.getWidth(), login.getHeight(),Image.SCALE_REPLICATE);
        elei = new ImageIcon(eleI);
        login.setIcon(elei);
        } catch (IOException e) {
            // TODO Auto-generated catch block
          
        }          
    }
   
    @Override
    public void mouseEntered(MouseEvent arg0) {
        try {
            eleI = ImageIO.read(new File("/MyFirst/src/images/loginhover.png"));
      
        eleI = eleI.getScaledInstance(login.getWidth(), login.getHeight(),Image.SCALE_REPLICATE);
        elei = new ImageIcon(eleI);
        login.setIcon(elei);
        } catch (IOException e) {
            // TODO Auto-generated catch block
          
        }          
    }
   
    @Override
    public void mouseClicked(MouseEvent arg0) {
        // TODO Auto-generated method stub
      
    }
});

user.addMouseListener(new MouseListener() {
   
    @Override
    public void mouseReleased(MouseEvent e) {
        user.setText("");
      
    }
   
    @Override
    public void mousePressed(MouseEvent e) {
        // TODO Auto-generated method stub
      
    }
   
    @Override
    public void mouseExited(MouseEvent e) {
        // TODO Auto-generated method stub
      
    }
   
    @Override
    public void mouseEntered(MouseEvent e) {
        // TODO Auto-generated method stub
      
    }
   
    @Override
    public void mouseClicked(MouseEvent e) {
        // TODO Auto-generated method stub
      
    }
});

pass.addMouseListener(new MouseListener() {
   
    @Override
    public void mouseReleased(MouseEvent e) {
        pass.setText("");
      
    }
   
    @Override
    public void mousePressed(MouseEvent e) {
        // TODO Auto-generated method stub
      
    }
   
    @Override
    public void mouseExited(MouseEvent e) {
        // TODO Auto-generated method stub
      
    }
   
    @Override
    public void mouseEntered(MouseEvent e) {
        // TODO Auto-generated method stub
      
    }
   
    @Override
    public void mouseClicked(MouseEvent e) {
        // TODO Auto-generated method stub
      
    }
});
    }

    public static void main(String[] args) throws Exception {
        FirstGUI g=new FirstGUI();

    }
}
 

Here are the images that you will require place it in the image folder and store it in the src folder of your eclipse Java project Folder:


If you have found any difficulties, feel free to comment me. I will definitely try to answer those questions. In the further tutorials I will demonstrate more complex designs so that you can design your own GUI Application.

Happy Programming with Designing

Programming the Designs(GUI) Part-2

Hello Designers,
Today I am going to explain you about GUI designing using Java Programming practically. So, hoping that you have already installed all required software if not, then you need to install it fast to go withe flow. Here I will give you the links for software that I didn't provided earlier because I want you to search it online on your own.
1. Eclipse IDE 32-bit
2. JDK 1.7 for 32 and 64 bit
3. Adobe Photoshop CS3/7.0

Now you are ready for doing it, so we will design this form:


Step1: Create a New Java Project
This is the only basic login page that we will design today:
Follow to create a Java Project
In the above image you see I have created a Java Project because before writing any Java code you need to create a Java Project.
To create a Java Project you need to select-Menu>File>New>Java Project. Then you will see a Dialog box "New Java Project", just write the name of project and choose your java environment as I selected as "JavaSE 1.7", This will come by Default otherwise select it from the list.(Considering you have installed JDK1.7).

Now just click Finish and done.

Step2: Create your Class: 
Package Explorer
Next, you will see your project in Package explorer(You can enable all windows by going Menu>Window>Show View). Now right click on the Project on Package Explorer and select New and then select class to create a Java class. Here is the view of mine:
Create a java class
After that you will see a Dialog box"New java Class", provide a name to class and check all boxes below as shown in the above figure and click finish and done.

Step3: Start programming
Now you will face a new class named "FirstGUI.java" with some predefined codes as shown below:
The FirstGUI.java class
Here is the declarations you need to include in class:
public class FirstGUI{
//declaration
    public static JFrame fr;
    public static JLabel back,login,loginl,text1,text2,rapid;
    public static JTextField user;
    public static JPasswordField pass;
    public static Font f;
    public static Container c;
    public static Image backI,eleI;
    public static ImageIcon backi,elei;

.
.
.
}

First you need to create a Frame in Swing so I used JFrame class. Then, for background I used a JLabel  instead of Button I used login and loginl JLabel for designing it well. And for textfields background I used again JLabel text1 and text2. rapid JLabel is for Heading I have given on top.

I have used JTextField for user name entry and JPasswordField for password entry. To set Font other than default one I used Font.
 To store all this components on the Frame I have used Container class that hold up all the components.

Here is the code snippet for the initialization of components inside constructor:
.
.

public FirstGUI() throws Exception {
fr=new JFrame();//Frame initialization
        

//font for headings
        f=new Font("Arial Rounded MT Bold", Font.BOLD, 32);
      

  //container pane for adding controls
        c=fr.getContentPane();
        c.setLayout(null);
       
        //initialization of controls
        back=new JLabel();
        user=new JTextField("User name");
        pass=new JPasswordField("Password");
        login=new JLabel();
        loginl=new JLabel("Login",JLabel.CENTER);// centered text
        text1=new JLabel();
        text2=new JLabel();
        rapid = new JLabel();

.
.
.


In the above code, I have initialized all components with new keyword. We need to attach our container to Frame and it can be done with the help of getContentPane();. We have to make our layout null otherwise the components are stored on one another filling whole Frame.

Now after Initialization we need to set the size and location of components on Frame by using setBounds() functions.

.
.
.
//setting bounds of the frame and other components
        fr.setBounds(0,0, 500, 500);
        back.setBounds(0,0,fr.getWidth(),fr.getHeight());
        user.setBounds(172,  138, 180, 61);
        pass.setBounds(172,  210, 180, 65);
        loginl.setBounds(155, 286, 197, 65);
        login.setBounds(loginl.getBounds());
        rapid.setBounds(0, 38, 484, 71);
        //background image bounds
        text1.setBounds(user.getBounds());
        text2.setBounds(pass.getBounds());

.
.
.
 The above code will provide us with the size and location of components and now we need to set image to labels that are declared for that purpose e.g back for background image:
.
.
.
//background image
        backI = ImageIO.read(new File("/MyFirst/src/images/back1.jpg"));  
        backI = backI.getScaledInstance(fr.getWidth(), fr.getHeight(),Image.SCALE_REPLICATE);
        backi = new ImageIcon(backI);
        back.setIcon(backi);
      
        //login click
        eleI = ImageIO.read(new File("/MyFirst/src/images/login.png"));  
        eleI = eleI.getScaledInstance(login.getWidth(), login.getHeight(),Image.SCALE_REPLICATE);
        elei = new ImageIcon(eleI);
        login.setIcon(elei);
      
        backI = ImageIO.read(new File("/MyFirst/src/images/textbox.png"));  
        backI = backI.getScaledInstance(user.getWidth(), user.getHeight(),Image.SCALE_REPLICATE);
        backi = new ImageIcon(backI);
        text1.setIcon(backi);
        text2.setIcon(backi);
      
        backI = ImageIO.read(new File("/MyFirst/src/images/RapidAbcd.png"));  
        backI = backI.getScaledInstance(rapid.getWidth(), rapid.getHeight(),Image.SCALE_REPLICATE);
        backi = new ImageIcon(backI);
        rapid.setIcon(backi);
      
        user.setFont(new Font("Arial", Font.BOLD, 15));
        user.setForeground(Color.gray);
        pass.setFont(new Font("Arial", Font.BOLD, 15));
        pass.setForeground(Color.gray);
        loginl.setFont(new Font("Arial", Font.BOLD, 20));
        loginl.setForeground(Color.white);
        

//add all components
        c.add(rapid);
        c.add(user);
        c.add(pass);
        c.add(text1);
        c.add(text2);
        c.add(loginl);
        c.add(login);
        c.add(back);   
      
        fr.setDefaultCloseOperation(JFrame.EXIT_ON_CLOSE);
        fr.setVisible(true);

.
.
.
}
ImageIO.read() function will provide us with the facilty of loading image from the computer but this function requires a object of File which I used directly in the function otherwise I can use in this way too:
File path=new File("/MyFirst/src/images/back1.jpg");
ImageIO.read(path); 


getScaledInstance() function give us facility og scaling the image as per the size of Label on which we need to assign image as icon.
And we need to use finally ImageIcon object to set icon to JLabel.

Similarly, assign image to all labels required. Finally add all components to Container by using add() function.

And then make frame closable by using default Close Operation and make visible the frame by using setVisible() to true.

Now we need to add events to lables and textFields as shown below snippets:
.
.
.
login.addMouseListener(new MouseListener() {
   
    @Override
    public void mouseReleased(MouseEvent arg0) {
        try {
            eleI = ImageIO.read(new File("/MyFirst/src/images/loginhover.png"));
       
        eleI = eleI.getScaledInstance(login.getWidth(), login.getHeight(),Image.SCALE_REPLICATE);
        elei = new ImageIcon(eleI);
        login.setIcon(elei);
        } catch (IOException e) {
            // TODO Auto-generated catch block
           
        }   
    }
   
    @Override
    public void mousePressed(MouseEvent arg0) {
        try {
            eleI = ImageIO.read(new File("/MYFirst/src/images/loginclick.png"));
       
        eleI = eleI.getScaledInstance(login.getWidth(), login.getHeight(),Image.SCALE_REPLICATE);
        elei = new ImageIcon(eleI);
        login.setIcon(elei);
        } catch (IOException e) {
            // TODO Auto-generated catch block
           
        }           
    }
   
    @Override
    public void mouseExited(MouseEvent arg0) {
        try {
            eleI = ImageIO.read(new File("/MYFirst/src/images/login.png"));
       
        eleI = eleI.getScaledInstance(login.getWidth(), login.getHeight(),Image.SCALE_REPLICATE);
        elei = new ImageIcon(eleI);
        login.setIcon(elei);
        } catch (IOException e) {
            // TODO Auto-generated catch block
           
        }           
    }
   
    @Override
    public void mouseEntered(MouseEvent arg0) {
        try {
            eleI = ImageIO.read(new File("/MyFirst/src/images/loginhover.png"));
       
        eleI = eleI.getScaledInstance(login.getWidth(), login.getHeight(),Image.SCALE_REPLICATE);
        elei = new ImageIcon(eleI);
        login.setIcon(elei);
        } catch (IOException e) {
            // TODO Auto-generated catch block
           
        }           
    }
   
    @Override
    public void mouseClicked(MouseEvent arg0) {
        // TODO Auto-generated method stub
       
    }
});

.
.
.

Don't worry about the code because you do not need to write it just use ctrl+space after (dot.) to addMouseListener and again inside () enter new, again enter addMouseListener and it will generate auto codes. and type the codes.

These codes are actually help for creating some effects on the JLabel Login. After every events I just changed the image and that's it.

The Entire file is on the next tutorial, must read!
If you have found any difficulty, please comment me here!
Happy Programming with Designing!
 

Saturday, 1 August 2015

Programming the Designs(GUI) Part-1

First of all, Thank You to read my blog regularly, I don't expect anything from you but just want to help you so that you can have your skills to be used for better purpose that leads to your bright future.

So, without being taking more time I will start with the main concern. In this new segment you will have Java programming, Python Programming with some design tools. I will mainly focus on Java GUI designing using Swing.

Let's start with it-
I have divided whole things into part so that I can add some more things if required further.

What is GUI programming?
This is not the actual word that you will find on the Google and may differ some meaning elsewhere. GUI programming is the term used for designing Graphical User Interface through programming and here I will suggest Java programming.

The reason for choosing Java is that it is a Platform Independent Language, that means it can be port to any machine and code will run in same manner as it was run previous machine/platform.

How to implement?
In Java GUI programming, we require some tools that you should download immediately to start with my tutorials. You will need:
1. jdk1.7 and above
2. Eclipse Indigo or Eclipse Luna(For ease of coding)
3. Adobe Photoshop(For designing images)  
4. If Possible Install Google's Picasa picture manager tool
 These are the basic requirements that will be important for all tutorials, extra things needed will be mentioned specially in the each tutorials.

If you already have some idea about Java Swing then its well and good otherwise just follow the instructions in the tutorials thoroughly. 

What is use of it?
You are definitely thinking of its usage. This will help you to develop your own hyper Interactive application GUI with your own created components.

You can also able to develop the Games with the help of further tutorials because I have created some games too and I will definitely help on that if you have something about in your mind.

So, I will end this Part-1 here and starting with the Implementations from the next tutorials.

Happy Designing!  


Saturday, 25 July 2015

Remove Background from a picture

Hello Designers, I am posting after a very long break but it is a necessity to take a break to design and increase scope of designing for a designer. So, today I bring you a basic method of removing the background from a picture which is very complicated work actually but after a long time work you will get definitely what you want.


1. First decide picture(Normally with single color background for start up):

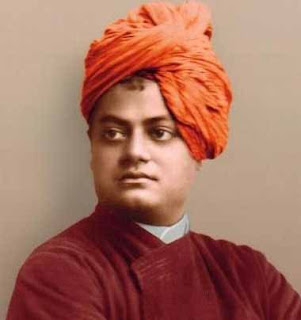
Here is the picture of Vivekananda I have taken for this purpose:

note: You can use this image for reference.

2. Now start work on Photoshop 7.0 or above:

 Next, you need to create new workspace by pressing CTRL+N or by using Menu bar>File>New.

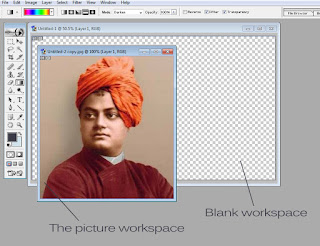
Make sure you will have blank workspace, then copy and paste your picture above or go to Menu Bar>File>Open>Browse your picture

It will appear like this::

3. Select Lasso tool:

Need to right click on the tool menu to select Lasso tool if it is not already selected tool. Now next step will be selecting the area of interest only that means Vivekananda's picture only same like as I have done:

3. Copy the selected item on other workspace

Here you will require another blank workspace, just add it and paste this on that workspace just like I have done::

Here you can also just drag and drop on the other workspace like me.

next go to the tool menu and select Magic Wand Tool:

4. Now erase extra matter on picture:

Here, it is somehow haptic task to eliminate those extra matter, but don't worry you can do it anyhow with me.

Now delete this area using delete button on your keyboard and similarly select others with the help of magic wand tool but there may be some instance where you need to manually erase things by using Eraser Tool as shown below:

In such scenario you need to use eraser tool, and use this tool with caution because it may erase your crucial part of picture but thank Photoshop that we have ctrl+z facility. So try it because you may not succeed in the first time.

Note: reduce the size of eraser from the properties menu above the Tool Box. Your picture will look like as below picture:

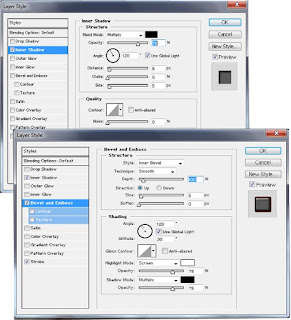
In order to hide some cutting edges you can use blending options that I have applied to it.

Now you are ready with your image and just add a background to it that you have previously created by using my previous tutorials Design Background

5. Finalize:

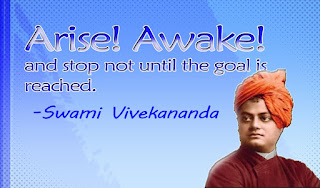
Now this is the final step of this tutorial, you need to use now the blank workspace with size 1366*800 approximately and drag and drop the pic to the blank workspace. I have added a simple background with some quotes

You need to select the background layer then

If you want to enhance more then you can use Brush tool on the border of Vivekananda's picture. It will definitely enhance the quality.

Here, I leave my tutorial with you to place another tutorial to show you more but this time I will use a programming language.

Happy Designing.