Thursday, 18 June 2015

Some background examples- Designed by me

You can use my backgrounds for free and start your foreground designing. I love to be some part of your unique designing.

 Here are my some of designs:
DREAM

Diagonals

Blueno

Greeno

Diagoline

Matrixo

Gray-tempt

Black-tempt
Note:  Please do not just right click and save image, you need to click on the image and it will show you the full image and then save it.

Conclusion:
So, here I just given you a template so that you can start your innovative designing. You can use these designs for free as these are my own created designs but you cannot use these for the commercial use. In the next tutorials I will now proceed with the complexity of 3D and 2D designs concepts and myths and then actual designing.

Thursday, 11 June 2015

Designing a Wallpaper


In the previous two tutorials I have demonstrated designing a background using basic tools, but now I want to increase some designing level from basic. In this tutorial I am going to tell you how you can design a wallpaper by using previously designed background. So what you will need for this:


  1. First concentration and thinking

  1. Adobe Photoshop

  1. Background image(Designed in previous tutorials link)


That is it you required to design your own wallpaper. Below are the steps with pictures:


Step 1:


Assuming that you have the background image but we required actually the .psd format so if you didn't saved your design in .psd format then just redraw your image according to the previous tutorials as it may be helpful to you for getting it quickly. When you finished with saving the design just close everything and open again the file which you have saved in .psd format.


Your file will somehow look like this:
Normal Background

Step 2:


Next you have to right click on the Layer 1 on Layer Manager Window and select blending options on popup. This will open a new sub-window that will provide you with the various options but now at this instance we have to just focus on the two things:


  1. Bevel and Emboss
  2. Texture


You make sure that you have the below settings in it:


Blending
Step 3:

After blending you may result in similar type of image as I have:

 
Blended Output design


But if did not get don't worry you can proceed or you can repeat above Step 2. SO assuming that you completed successfully Step 2. Now we are ready with our background, just add the Type tool which will look like below and after selection your cursor changed to it: 

Type tool selection


Select Black color from the Tool Box Set Foreground Color, now select the Font Face and style as Bold and Goudy Old Style respectively and size as 242.11 pt, :

Text
Step 3:


After committing changes again click on the  image but this time below the orange strip and make sure you have selected Type Tool, enter the words as an Indian, and again commit your changes and then again click on image and type Designer, See below:


Final output Step 3


So I will directly telling it now onwards so CTRL+click on the I am layer on Layer Manager Window, it will select the whole text I am. 

Now just again you have to right click on the text Layer I am and select Blending options from pop up and select those options shown in image below (just tick on the options and remains settings as default):
 
Blending Text

Now go to Menu Bar>Select>Modify>Contract, make sure to make contract as 5 px. Make sure you have deleted the selected portion:
Contraction of layer
Note: If you have getting something else or can't delete the part then you should Rasterize Layer on the layer by right clicking on it in Layer Manager Window. 

Similarly you just follow above steps for all text layers we have created and you will get the following output:

Final
Finally save your file as .psd format and then save as .jpg or .png format.


Conclusion:

I hope you have understood what I want to demonstrate here. This tutorial is for telling you that you can design your own wallpapers within 10-15 mins just by using your own thinking power and creativity. In the next tutorial I will tell you about various background design and visual effects in the Photoshop, so do not miss it.
---Good Luck---

Wednesday, 10 June 2015

Starting with the basic- Design a Background(Part 2)


Previously we have seen the various parts of Adobe Photoshop and their usages with diagrams. We have already seen how we can open a window in Photoshop and select what we want from the options. Now I will tell you actual background designing, you do not worry about it just some try and you have done it.


So, here is the window you will get after clicking OK button on that sub-window you have seen after selecting New from Menu Bar provided with the setting you see in that image I uploaded in previous blog.
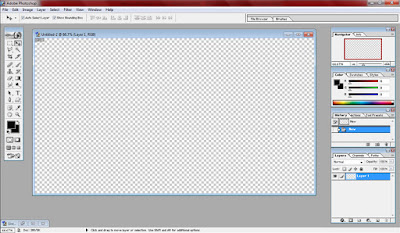

New window appears


Then select Magic Wand tool for selecting the whole area on window and your cursor will change to that tool, now click on the window which is shown :
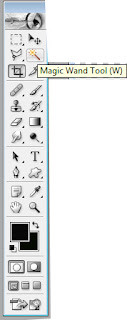
Select Magic Wand Tool
Now the whole area is highlighted with the dotted lines on the border that means it got selected. After that you need to choose tool that can fill that with something. And for that we will use Brush Tool:
Select Brush Tool
Now its time to look into our design window, just select a particular color. For my background I have chosen three colors i.e first ORANGE then White and then Green. You can choose yours, I have chosen these because I am designing Indian Flag as background. 
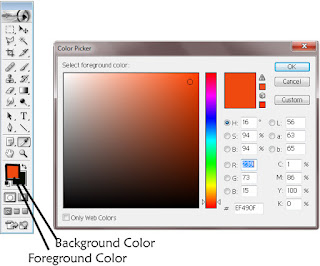
Color Picker
Now just ensure that you have selected the Brush Tool and in the Option Pane choose the stroke style, now just make a stroke on the design window as I have done below:
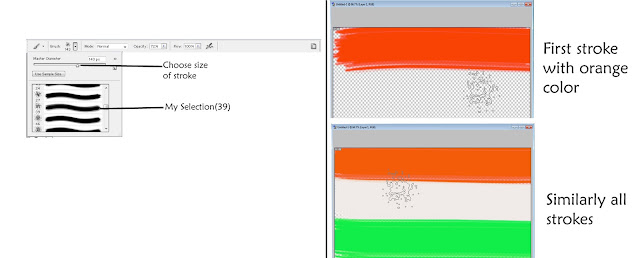

Strokes

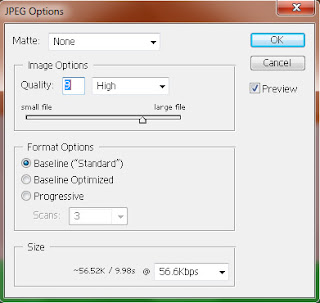
 Finally you will get the image as above, now you can save it as any extension you want. I used to save it as either PNG or JPEG extensions, after clicking OK you need to select quality of image.
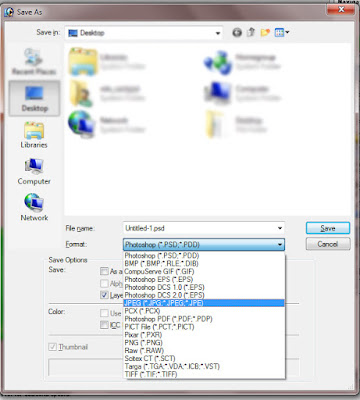
Save File as JPEG

JPEG Options

Here you just select the quality as I used in the image or choose any of your choice. I saved file as jpeg and it will appears amazingly as background is converted to white but if you save it in png format you will see that its background will be empty. Just try to save it. You can use your creativity and thinking to design fabulous backgrounds.

Here is the final jpeg image I have created.
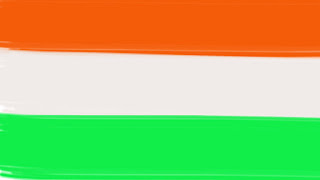
flag.jpeg
Conclusion
So I have just demonstrated very basic designing in Photoshop using strokes to design your own background pic. There are too many tools yet, just try to use it otherwise I am always there to share my experience with all the stuff in my next blogs. In next tutorial I will demonstrate to enhance this image more precisely by using software other than Photoshop.

---Good Luck---


Tuesday, 9 June 2015

Starting with the basic- Design a Background(Part 1)


I will start with the basic of designing the background images for any foreground. I started with the Adobe Photoshop 7.0 at early stages of my designing. You should start with this version of Adobe Photoshop in order to learn the core parts even further versions are also requiring these basics as they are developed based on this.


Installation Steps:

  1. Download the Adobe Photoshop 7.0(recommended) or cs6 either from this link:


      OR 


  1. Install the software and enter the key you got. Open the Photoshop


  1. Just click OK when a dialog appears in front of you after reading everything. Now you are ready to do the magic stuff.


So after this small introduction I just starting the tutorial which can be detailed below:


Know the Parts:


First you should have knowledge of what you are using and here is the snapshot of the window you will get after installing and opened in windows:


Parts of Adobe Photoshop
Here is a small introduction to the parts of the window you see:

  1. Toolbox: This contains many tools that can help you to design and enhance your image.

Tool Box
  1. Navigation Bar: This the navigation window of your creations you are working in the same session.

  1. Color manager: This window helps you to apply and experiment various color combinations you want to add, as this is an alternative way of applying colors.
  2. History pallet: This provides the way of undoing the changes we have made in our image window. All the actions and events we have made on image stored here.
  3. Layer manager: This window helps to mange our layers that we have created in our image.

We can copy or duplicate any layer anytime and also remove it by just right clicking on it.


Open New Window:


To start any design you should create an empty window by clicking on Menu Bar: File>>New

A sub-window appears like below (You can instantly press ctrl+n):
Open New Window
Please select pixels from the width and height, by default its inches.

Conclusion:
It is the first part which contains introduction to the Photoshop and tried to make you feel comfortable with the parts of Photoshop. Don't miss the next blog in which I will actually starting the designing Background.

---Good Luck---

Monday, 8 June 2015

Do we know actual meaning of designing?


 I am not a rookie but also not an expert in this field, I am always trying to improve myself every second. I will share how I learnt all stuff and how I implemented it in the day to day life. The most important thing you should know and I realized that the designer should always think something even if it is nothing and that’s make them very uncommon and unique from others who don’t .

 Whenever you decide to design something then their will be many things you should obey, these are not actually the rules and regulations but the necessity to be a good designer. The graphics is most important in our life because it is a way to express yourself similar like DANCE. So if you want to be a designer you should be good enough to express yourself in any way.

What design meant?

 I am starting this blog for making everyone believe that they can also design. Designing is not the proprietary of  a particular person, but it is the art of expressing your thoughts in the form of visual perspectives. There was always a myth in everyone's mind that designing is only the subject of civil and mechanical engineers because they have to build machines, they need to know about the divider and all geometry stuff and that's why many of us believe that we have to learn all geometry stuff even if we are not belongs to that field.


Design mean this


 But I will tell you through my blog about various approaches that can help you to design with less complexity of geometry stuffs that we have learned in the 9th and 10th standard and that is the reason I believe that Any Body Can Design i.e. ABCD rapidly.

Conclusion
So, I will try my best to share all my knowledge with you in order to nurture your creativity and design skills. Be with me for further exciting tutorials with tools and programming to design.